> ## Documentation Index
> Fetch the complete documentation index at: https://dripart-docs-comfy-router-docs.mintlify.site/llms.txt
> Use this file to discover all available pages before exploring further.
# Cosmos Predict2 Video2World ComfyUI Official Example
> This guide demonstrates how to complete Cosmos-Predict2 Video2World workflows in ComfyUI
Cosmos-Predict2 is NVIDIA's next-generation physical world foundation model, specifically designed for high-quality visual generation and prediction tasks in physical AI scenarios.
The model features exceptional physical accuracy, environmental interactivity, and detail reproduction capabilities, enabling realistic simulation of complex physical phenomena and dynamic scenes.
Cosmos-Predict2 supports various generation methods including Text-to-Image (Text2Image) and Video-to-World (Video2World),
and is widely used in industrial simulation, autonomous driving, urban planning, scientific research, and other fields.
It serves as a crucial foundational tool for promoting deep integration of intelligent vision and the physical world.
Cosmos-Predict2 source code and documentation
Cosmos-Predict2 model collection
This guide will walk you through completing **Video2World** generation in ComfyUI.
For the text-to-image section, please refer to the following part:
Using Cosmos-Predict2 for text-to-image generation
Run Cosmos-Predict2 workflows on Comfy Cloud with powerful GPUs
Make sure your ComfyUI is updated.
* [Download ComfyUI](https://www.comfy.org/download)
* [Update Guide](/installation/update_comfyui)
Workflows in this guide can be found in the [Workflow Templates](/interface/features/template).
If you can't find them in the template, your ComfyUI may be outdated.
If nodes are missing when loading a workflow, possible reasons:
1. You are not using the latest ComfyUI version (Nightly version)
2. Some nodes failed to import at startup
* [Cloud](https://cloud.comfy.org) will update after ComfyUI stable release.
So, if you find any core node missing in this document, it might be because the new core nodes have not yet been released in the latest stable version. Please wait for the next stable release.
## Cosmos Predict2 Video2World Workflow
When testing the 2B version, it takes around 16GB VRAM.
### 1. Workflow File
Please download the video below and drag it into ComfyUI to load the workflow. The workflow already has embedded model download links.
Run this workflow on Comfy Cloud with pre-installed models
Download the JSON format workflow file
Please download the following image as input:

### 2. Manual Model Installation
If the model download was not successful, you can try to download them manually by yourself in this section.
**Diffusion model**
cosmos\_predict2\_2B\_video2world\_480p\_16fps.safetensors
For other weights, please visit [Cosmos\_Predict2\_repackaged](https://huggingface.co/Comfy-Org/Cosmos_Predict2_repackaged) to download.
**Text encoder**
oldt5\_xxl\_fp8\_e4m3fn\_scaled.safetensors
**VAE**
wan\_2.1\_vae.safetensors
File Storage Location
```
📂 ComfyUI/
├──📂 models/
│ ├── 📂 diffusion_models/
│ │ └─── cosmos_predict2_2B_video2world_480p_16fps.safetensors
│ ├── 📂 text_encoders/
│ │ └─── oldt5_xxl_fp8_e4m3fn_scaled.safetensors
│ └── 📂 vae/
│ └── wan_2.1_vae.safetensors
```
### 3. Complete Workflow Step by Step
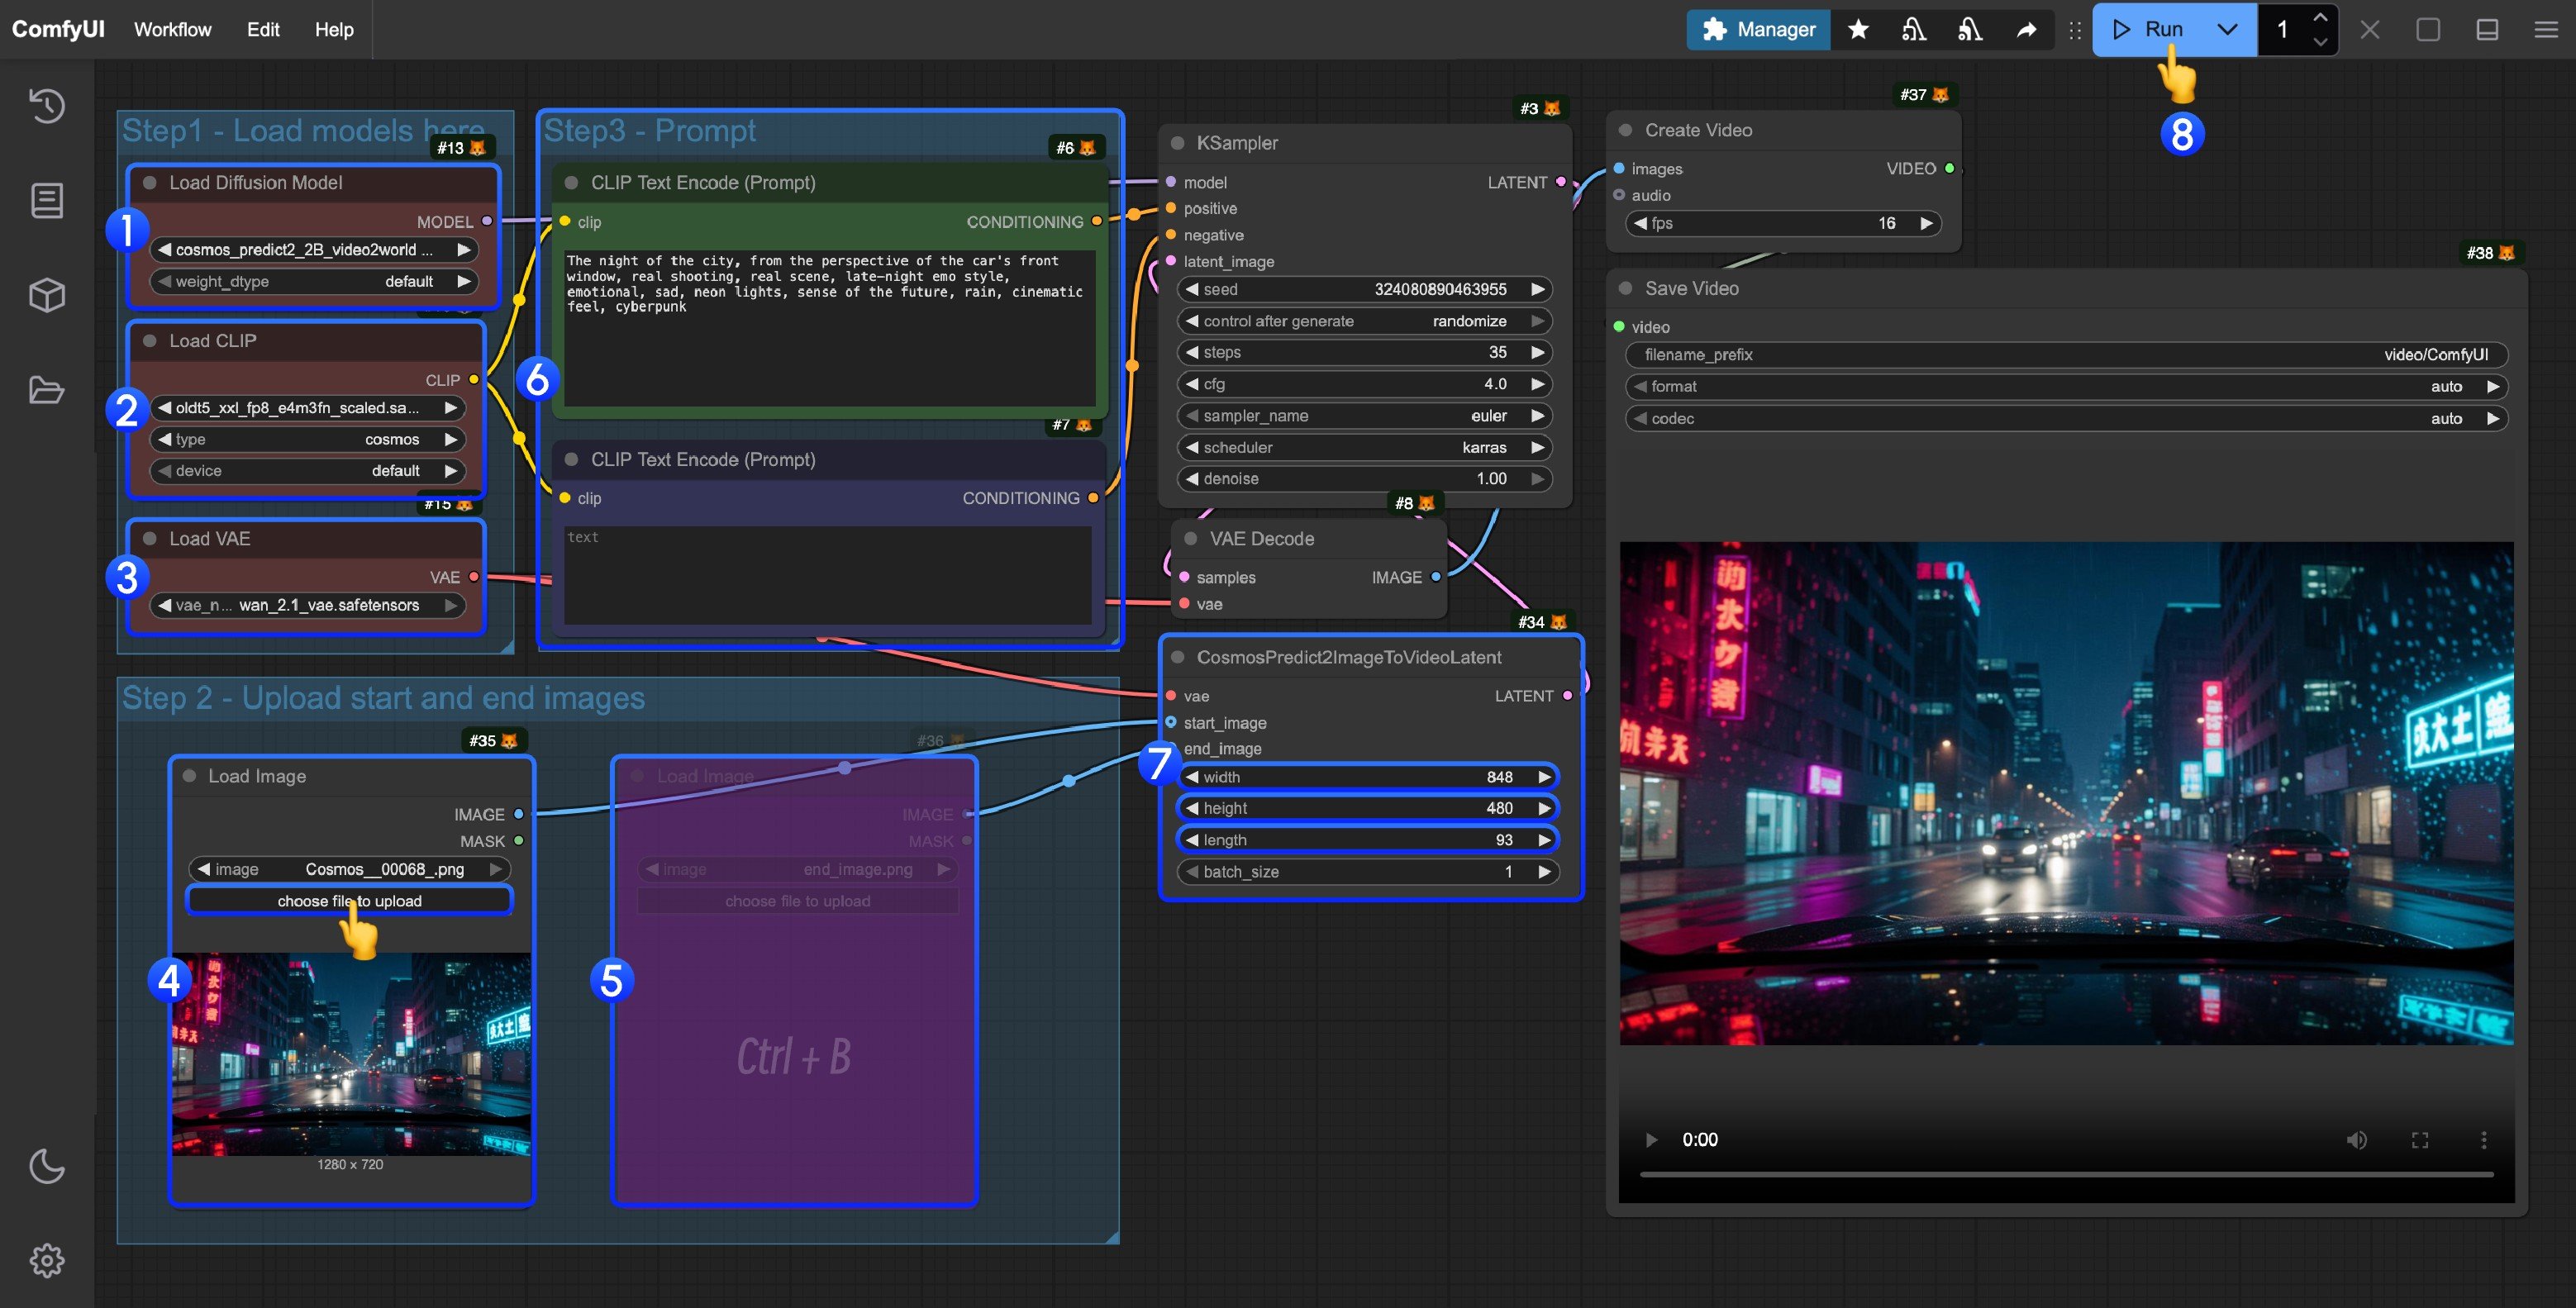 Please follow the steps in the image to run the workflow:
1. Ensure the `Load Diffusion Model` node has loaded `cosmos_predict2_2B_video2world_480p_16fps.safetensors`
2. Ensure the `Load CLIP` node has loaded `oldt5_xxl_fp8_e4m3fn_scaled.safetensors`
3. Ensure the `Load VAE` node has loaded `wan_2.1_vae.safetensors`
4. Upload the provided input image in the `Load Image` node
5. (Optional) If you need first and last frame control, use the shortcut `Ctrl(cmd) + B` to enable last frame input
6. (Optional) You can modify the prompts in the `ClipTextEncode` node
7. (Optional) Modify the size and frame count in the `CosmosPredict2ImageToVideoLatent` node
8. Click the `Run` button or use the shortcut `Ctrl(cmd) + Enter` to run the workflow
9. Once generation is complete, the video will automatically save to the `ComfyUI/output/` directory, you can also preview it in the `save video` node
Please follow the steps in the image to run the workflow:
1. Ensure the `Load Diffusion Model` node has loaded `cosmos_predict2_2B_video2world_480p_16fps.safetensors`
2. Ensure the `Load CLIP` node has loaded `oldt5_xxl_fp8_e4m3fn_scaled.safetensors`
3. Ensure the `Load VAE` node has loaded `wan_2.1_vae.safetensors`
4. Upload the provided input image in the `Load Image` node
5. (Optional) If you need first and last frame control, use the shortcut `Ctrl(cmd) + B` to enable last frame input
6. (Optional) You can modify the prompts in the `ClipTextEncode` node
7. (Optional) Modify the size and frame count in the `CosmosPredict2ImageToVideoLatent` node
8. Click the `Run` button or use the shortcut `Ctrl(cmd) + Enter` to run the workflow
9. Once generation is complete, the video will automatically save to the `ComfyUI/output/` directory, you can also preview it in the `save video` node